

10 Tips for Choosing the Best LED Garden Lights?

10 Tips for Choosing the Best LED Garden Lights?

A well-planned Led Garden Light setup should make a garden feel welcoming, not washed out. Choosing fixtures takes more than comparing brightness or price. Start with the space itself: a damp path, a shaded flower bed, and an exposed patio each need different lighting. Notice where people walk, where water collects, and which plants deserve attention after sunset. Small details matter. A beam aimed at a pale wall can feel harsh, while a low, shielded light can reveal texture without glare.

Landscape-lighting specialist Maya Chen offers this guiding principle: “Light the garden for people first, and the plants will look more natural.” Use that idea when considering beam angle, color temperature, weather resistance, power options, and fixture placement. A warm tone may suit a seating area; a focused beam may better mark steps. Check product specifications carefully, since “water-resistant” does not always mean suitable for every exposed location. And remember that more lights do not automatically create a better result. Sometimes one fixture is still too much.

This guide presents ten practical tips for choosing garden lights, from setting a realistic budget to planning installation and maintenance. It also considers durability, energy use, safety, and how lighting looks from inside the home. Take measurements before buying. Test placement after dark, if possible. Some choices are easier to judge in person than on a product page. A thoughtful setup may take a little adjusting, but that is part of getting it right.
10 Tips for Choosing the Best LED Garden Lights?

Identify Your Garden’s Lighting Needs and Key Areas

Before choosing LED garden lights, decide what the garden needs after dark. Do you want safe footing, a place to dine, or a soft view from indoors? Walk the space at dusk and note where shadows fall. A path beside a hedge may need more attention than an open lawn. Tip: Mark steps, gates, and uneven paving on a simple sketch.

Separate practical lighting from decorative lighting. Paths and stairs benefit from even, restrained illumination, while a tree or textured wall may suit a gentle accent. Avoid aiming lights toward windows or directly into visitors’ eyes. Brightness can feel useful in a shop, yet harsh at home. I’ve found that judging light from one standing spot can be misleading; check it from the patio and the house, too.

Tip: Test one area before planning the whole garden. Temporarily place a lamp near a step or seating area, then look again after dark. Consider where cables can be safely routed and whether exposed fittings need suitable weather protection. Think about changing seasons as well: leafy branches may block a beam in summer. A small plan helps, though it will not predict every shadow.

Compare Brightness, Color Temperature, and Beam Angle

When choosing garden lights, compare useful light on the ground, not just the lumen number on the box. Lumens measure total output; lux measures light reaching a surface. For a short path, a modest output with even spacing may feel safer than one glaring fixture. Check the maker’s beam diagram, too. A narrow beam can highlight a tree trunk, while a wider beam can cover a patio. These are starting points, not guarantees; height and nearby walls change the result.

Color temperature matters after dark. Around 2700–3000 K usually looks warm against timber and foliage; cooler light can make pale paving appear stark. DarkSky International’s outdoor-lighting guidance favors warm-colored light and shielding that directs light down. Keep glare out of bedroom windows. The U.S. Department of Energy’s 2022 Solid-State Lighting R&D Opportunities report notes that leading LED packages can exceed 200 lumens per watt under laboratory conditions. Complete fixtures deliver less because drivers, heat, and optics reduce output. Compare fixture-level efficacy, not package claims. I would still test one light first. A wet stone path can reflect more light than expected, and my first beam-angle choice might be too broad.

10 Tips for Choosing the Best LED Garden Lights

Compare brightness, color temperature, and beam angle to match each light to its purpose.

Brightness: These approximate lumen ranges illustrate common starting points; the right output depends on the area, spacing, and surrounding light. Path lights often need less brightness than security or flood lights.

Color temperature: Choose about 2700–3000 K for a warm, relaxed garden feel, or around 3500–4000 K for a cleaner, more neutral appearance.

Beam angle: Narrow beams (about 15–30°) suit focused accents, medium beams (30–60°) work well for general highlighting, and wide beams (over 60°) cover broader areas.

Choose Efficient LEDs and a Suitable Power Source

Efficient LEDs can produce plenty of light while using less electricity than older bulbs. Compare lumen output, not wattage alone: lumens describe brightness, while watts measure energy use. A path light does not need to flood the whole yard. For a narrow walkway, modest output often makes edges visible without creating harsh glare. Warm white light, around 2700–3000K, usually feels softer near plants and seating areas. Check whether the fixture allows bulb replacement; an integrated LED may be efficient, but replacing the whole fitting later can be inconvenient. Small details matter.

Choose a power source that fits the garden, not just the price tag. Solar lights avoid wiring, but heavy shade and short winter days can reduce their runtime. A sunny afternoon is not a reliable test for every season. Mains-powered lights offer steadier output, though outdoor connections need suitable weather protection and careful installation. Low-voltage systems can work well for several fixtures; match the transformer’s capacity to their combined load. Leave some headroom rather than running it at its limit. I might be tempted to buy the brightest option, but that can make a small garden feel stark. Check the beam on the ground after dark, then adjust spacing or brightness if needed.

Check Weather Resistance, Materials, and Safety Ratings

Outdoor lights face more than rain. They also endure damp soil, sprinkler spray, dust, and sharp temperature changes. Check the fixture’s weather-resistance rating and confirm what it covers. An IP rating can help compare protection against dust and water, but the number matters only when it matches your garden’s exposure. A light beneath a roof needs different protection from one beside a pond. Read the product documentation, not just the packaging. Small detail. Worth checking.

Materials affect how well a fixture holds up. Powder-coated aluminum and suitable stainless steel can resist corrosion, while untreated metal may stain or weaken in wet areas. Plastic housings vary; some tolerate sunlight better than others. Look for clear information about UV resistance, seals, and replacement parts. A polished finish can look reassuring, but it does not prove durability. That is easy to overlook.

Safety ratings deserve equal attention. Check that the light is intended for outdoor use and that its voltage, cables, and connectors suit the installation. Low-voltage systems may simplify some garden setups, but they still need correctly rated components and careful placement. Keep connections away from standing water, and follow the manufacturer’s installation instructions. If wiring is unclear, ask a qualified electrician rather than guessing. Ratings reduce uncertainty; they cannot prevent every installation mistake.

10 Tips for Choosing the Best LED Garden Lights: Check Weather Resistance, Materials, and Safety Ratings
No. What to Check Practical Guidance Why It Matters
1 Weather-resistance rating Check the IP rating. IP44 provides protection against solid objects larger than 1 mm and water splashes; IP65 is dust-tight and protected against water jets. Choose a rating suited to the fixture’s location and likely exposure. An IP rating does not mean a light can be submerged unless its specifications explicitly allow it.
2 Suitable materials Look for outdoor-rated housings, such as coated aluminum or corrosion-resistant stainless steel. Grade 316 stainless steel generally offers better corrosion resistance than grade 304, particularly in coastal environments. Appropriate materials and finishes help resist rain, humidity, and corrosion over time.
3 Electrical safety marks Check for approvals or conformity marks relevant to your market, such as UL or ETL listing in the United States, or applicable CE requirements in the European Economic Area. Verify the exact product and intended use. Recognized testing or conformity information can help confirm that a product has been assessed against relevant electrical-safety requirements. Requirements vary by location.
4 Operating voltage Consider low-voltage systems, commonly 12 V or 24 V, for many garden-lighting layouts. Mains-voltage installations should follow local electrical codes and may require a qualified electrician. Voltage affects installation requirements, transformer selection, and the precautions needed around outdoor wiring.
5 Outdoor circuit protection Use outdoor-rated cables, connectors, and power supplies. In the United States, outdoor receptacles generally require GFCI protection; other regions have their own requirements for residual-current protection. Suitable protection helps reduce the risk of electric shock. Follow local codes and the manufacturer’s installation instructions.
6 Brightness and light distribution Compare lumens for light output and beam angle or distribution for how the light spreads. Path lights, accent lights, and security lights need different patterns and brightness levels. Matching output and beam shape to the task helps avoid dim areas and excessive glare.
7 Color temperature Check the correlated color temperature (CCT), measured in kelvins. Around 2700–3000 K generally appears warm white; higher values appear progressively cooler. Consistent color temperature can create a more coordinated look across paths, patios, and planting areas.
8 Solar-light performance For solar models, check the panel type and placement requirements, battery specifications, stated runtime, and whether runtime figures depend on a full charge or a particular brightness setting. Sun exposure, season, shade, and operating settings can all affect charging and nighttime performance.
9 Temperature and operating range Review the product’s stated operating-temperature range and any limits for its battery or power supply. Check that the range suits the local climate. Outdoor temperatures can affect electronic components and battery performance; specifications help show whether a fixture is suitable for the site.
10 Installation and maintenance Confirm mounting method, cable-entry seals, replaceable parts, cleaning instructions, and warranty terms. Keep connectors accessible and avoid placing fixtures where water can pool unless rated for that use. Clear installation and maintenance requirements make it easier to keep the lighting safe and working as intended.

Match Fixture Styles, Controls, and Installation Requirements

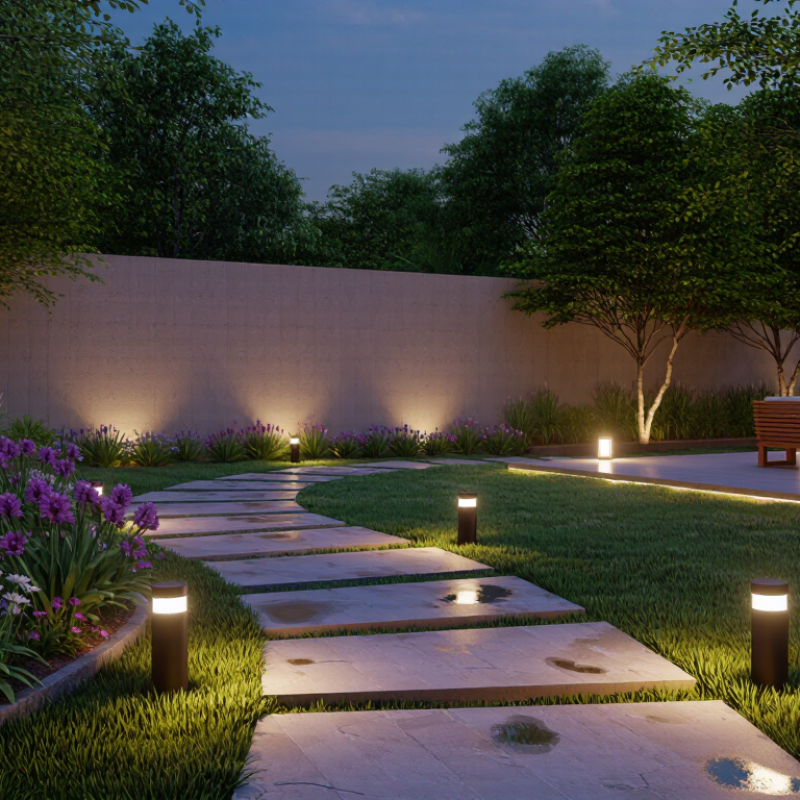
Match each fixture to the job. Low bollards can mark a path without shining directly into your eyes. Shielded downlights work well beneath eaves, while narrow-beam spots can pick out a tree or textured wall. Still, a bright path can feel oddly harsh. Check the beam angle and viewing position after dark, not just the fixture’s appearance in daylight.

Controls should fit how the garden is used. Photocells switch lights on at dusk; timers can limit operating hours. Motion sensors suit side entrances, but may interrupt quiet evenings on a patio. Consider separate control zones for paths, seating areas, and accent lighting. The U.S. Department of Energy’s Energy Saver guidance says LEDs use at least 75% less energy and can last up to 25 times longer than incandescent lighting. That helps, but poor placement can still waste light.

Before buying, check the installation details: power source, cable route, mounting surface, and access to a suitable transformer for low-voltage systems. Solar fixtures need enough direct sun, so a shaded border may disappoint. For wired installations, follow product instructions and applicable local electrical requirements; ask a qualified professional when the work exceeds your experience. Small oversight. Leave room to reach connectors and clean lenses. I’d also test one fixture at night before installing a whole row, because garden layouts rarely look exactly as planned.